
Industrial style kitchen lighting ideas are about blending raw, unfinished materials with functional, factory-inspired fixtures to create a space that’s both edgy and practical. With its unique mix of raw functionality, vintage charm, and modern edge, industrial design has become a powerful statement in Singaporean homes. However, choosing the right lighting is crucial to perfecting this aesthetic. Get it wrong, and your kitchen can feel cold and uninviting; get it right, and you create a bold, functional, and atmospheric heart of the home.
As a trusted, vertically-integrated design and renovation firm with RCMA CaseTrust and HDB licensing, we understand that great design is in the details. This guide is the only resource you’ll need, providing over 30 actionable ideas and expert tips from our in-house designers and electricians. We’ll cover everything from fixture types and materials to placement and layering, ensuring you can avoid common pitfalls and create a kitchen that is both stylish and perfectly practical.
What Defines Industrial Style Lighting? (The Core Principles)
To master the look, it’s essential to understand its DNA. Industrial style is not just about exposed brick and metal; it’s a design philosophy rooted in authenticity and purpose.
Inspired by History
The style originates from the workshops, factories, and warehouses of the late 19th and early 20th centuries. In these spaces, lighting wasn’t decorative—it was purely functional, built to be durable and efficient. Modern industrial design borrows this historical context, celebrating the unpretentious beauty of utility.
Raw and Unfinished Materials
Authenticity is key. This style proudly showcases materials in their raw or minimally finished state. Think metals like matte black steel, aged brass, and iron, often paired with other textural elements like exposed brick walls, concrete countertops, and reclaimed wood beams or shelves.
Function Over Form (That Still Looks Great)
Industrial design follows a “form follows function” principle. This means structural elements are often left visible. Look for exposed hardware like nuts and bolts, visible wiring (safely encased in conduit or stylish fabric cords), and pulley systems. The beauty lies in the honesty of the construction, creating a no-frills aesthetic that is both rugged and chic.
The Power of Contrast
One of the most compelling aspects of industrial design is the interplay of light and shadow. The style often pairs dark, heavy materials like blackened steel with the warm, inviting glow of exposed filament bulbs. This contrast prevents the space from feeling cold or sterile, creating a dynamic and atmospheric environment.
Key Industrial Lighting Fixture Types to Consider
Choosing the right fixtures is the first step in bringing your industrial kitchen to life. Each type plays a specific role in a well-layered lighting plan.
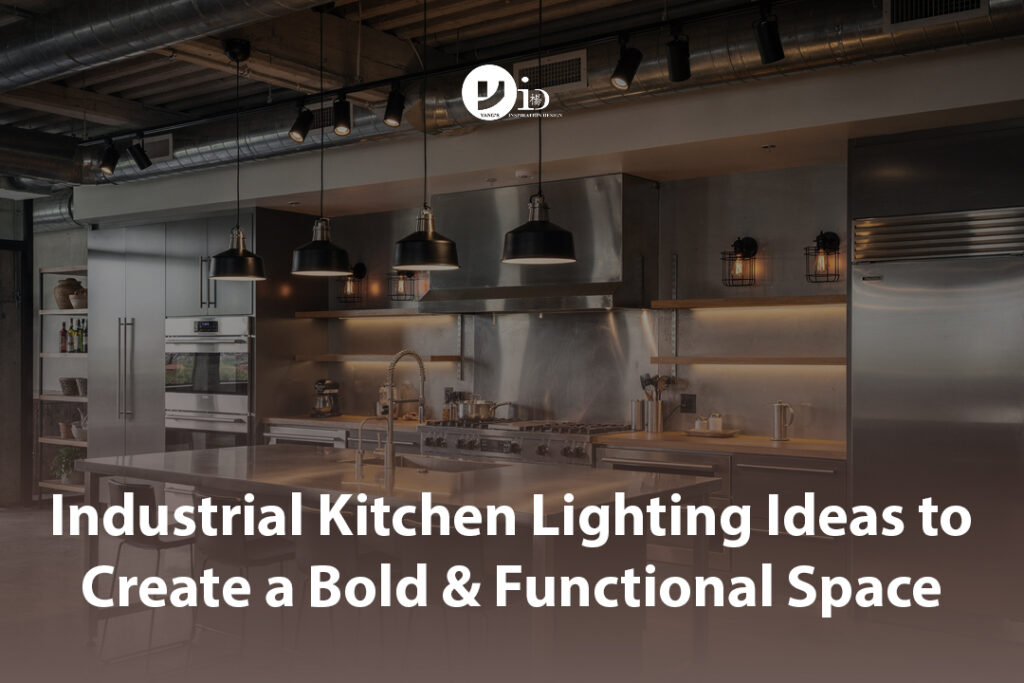
Pendant Lights: The Industrial Centerpiece
Pendant lights are a cornerstone of industrial kitchen design, often serving as the primary focal point over an island or dining area. They provide direct task lighting while making a powerful style statement.
- Popular Styles:
- Factory Dome Pendants: Large, metal dome shades, often in matte black, bronze, or enamel-coated finishes.
- Warehouse Cage Pendants: Metal cages that protect an exposed bulb, adding a rugged, utilitarian feel.
- Linear Bar Lights: A single, long fixture with multiple bulbs, perfect for illuminating the entire length of a kitchen island.
- Oversized Single Pendants: A single, dramatic pendant light can anchor a space and serve as a piece of sculptural art.
- Placement Pro-Tip: For multiple pendants over an island, space them 24-30 inches apart (from the center of each fixture) to ensure even light distribution without looking cluttered. The bottom of the pendants should hang 30-36 inches above the countertop to provide ample light without obstructing views.
Track Lighting: For Flexibility and Architectural Edge
Track lighting offers unparalleled flexibility, making it a practical and stylish choice for industrial kitchens. It allows you to direct light precisely where it’s needed, highlighting different zones and features.
- Benefits: It’s perfect for highlighting specific work zones like prep areas, architectural details like a textured brick wall, or open shelving displays. The adjustable heads let you create dramatic shadows and adapt the lighting as your needs change.
- Popular Styles: Matte black tracks with swiveling spot heads are a classic choice. For more character, look for tracks that support caged fixtures or mini pendants.
- Placement Pro-Tip: Run track lighting along the length of a galley kitchen for even illumination, or use it to frame the kitchen area in an open-plan HDB or condo. It’s also highly effective when mounted on exposed ceiling beams.
Flush & Semi-Flush Mounts: For Ambient Light in Any Space
Not every kitchen has high ceilings. For spaces with standard or lower ceiling heights (common in many Singaporean apartments), flush and semi-flush mounts provide essential ambient lighting without sacrificing style.
- When to use them: They are ideal for providing general, room-filling light. A semi-flush mount, which hangs a few inches down, can offer a bit more decorative presence than a fully flush fixture.
- Design Features: Look for fixtures that incorporate industrial elements like metal cages, simple geometric frames in black or brass, or designs that feature exposed bulbs. This proves that practical ceiling lights don’t have to be boring.
Wall Sconces: Perfect for Task and Accent Lighting
Wall sconces are the unsung heroes of a layered lighting scheme, adding depth and targeted light where you need it most.
- Role in a layered lighting scheme: They provide excellent task lighting for specific areas and can also serve as accent lighting to create a warm, ambient glow in the evenings.
- Popular Styles:
- Gooseneck Sconces: A vintage-inspired choice that directs light downward, perfect over a sink or open shelving.
- Pipe-Inspired Fittings: Fixtures made from metal pipes and fittings for an authentic, rugged look.
- Swing-Arm Sconces: Offer adjustable, targeted light for reading recipes or illuminating a breakfast nook.
- Placement Pro-Tip: Install wall sconces to flank a sink, stove, or a window. They are also great for adding light to open shelving. Safety Note: For areas near water, such as the sink, ensure you choose fixtures with an appropriate IP (Ingress Protection) rating to protect against moisture.
Industrial Chandeliers: Making a Dramatic Statement
For kitchens with high ceilings or in open-plan landed properties, an industrial chandelier can serve as a stunning, high-impact centerpiece.
- Best for: High-ceilinged kitchens, double-volume spaces, or dining areas within an open-concept layout.
- Design Features: Think multi-arm designs with exposed bulbs, sputnik-style chandeliers with a metal finish, or large, linear rectangular chandeliers that command attention over a large dining table or island.
Essential Materials and Finishes for an Authentic Look
The materials define the industrial aesthetic. Choosing the right finish will tie your lighting fixtures to the overall design of your kitchen.
Matte Black: The Go-To Industrial Finish
Matte black is the quintessential industrial finish. Its bold, utilitarian appearance creates a strong visual anchor and provides high contrast against lighter elements. It works because it’s understated yet powerful, pairing beautifully with stainless steel appliances, warm wood tones, and the rugged texture of exposed brick.
Aged Brass and Copper: Adding Warmth and Patina
While industrial design can feel raw, finishes like aged brass and copper introduce a layer of warmth and sophistication. These metals soften the harder edges of steel and concrete, and their natural patina develops more character over time, adding a sense of history and uniqueness to your space.
Brushed Steel and Chrome: For a Modern Industrial Vibe
For a cleaner, more contemporary take on the industrial look, consider brushed steel or chrome. These finishes are perfect for minimalist kitchens or spaces that lean towards a modern-industrial hybrid. They pair well with sleek cabinetry and polished concrete floors, creating a brighter, more refined aesthetic than their darker counterparts.
Raw & Reclaimed Materials: Concrete, Wood, and Exposed Wiring
True industrial style embraces imperfections and raw textures.
- Concrete: Light fixtures made from concrete or concrete-look materials add an unexpected and highly textural element.
- Wood: Reclaimed wood accents on a metal fixture can bridge the gap between industrial and rustic styles.
- Exposed Wiring: Intentionally using exposed metal conduit or fabric-covered electrical cords (installed safely by a licensed electrician) is a hallmark of the style, celebrating the mechanics of the fixture itself.
Signature Design Elements and The Right Bulbs
The details make the design. From the bulb itself to the structure that holds it, these signature elements complete the industrial look.
The Beauty of the Exposed Bulb
The exposed bulb is central to the industrial aesthetic, harking back to the earliest days of electric lighting.
- The Look: Vintage-style “Edison” filament bulbs are iconic for their warm, amber glow and intricate filament patterns, creating instant ambiance.
- Modern Upgrade: Traditional filament bulbs can be energy-intensive and hot. Pro Tip: Opt for dimmable LED Edison bulbs. They perfectly replicate the vintage look and warm glow while being energy-efficient, cool to the touch, and offering a much longer lifespan.
Cage-Like Structures: Functional and Rugged
Metal cages are a classic industrial feature. Originally designed to protect bulbs from breaking in busy factories, they are now a popular aesthetic choice. They add a layer of visual complexity and a rugged, protective feel to pendants and sconces, reinforcing the style’s functional origins.
Choosing the Right Color Temperature for Ambiance
The color of your light is just as important as the fixture itself. This is measured in Kelvin (K).
- Recommendation: For an industrial kitchen, we almost always recommend Warm White light (2700K – 3000K). This color temperature casts a cozy, inviting glow that beautifully balances the coldness of raw materials like metal, brick, and concrete. It makes the space feel like a home, not a factory floor.
- For Task Areas: In very task-heavy zones, such as your main prep counter, a slightly cooler Neutral White (around 3500K) can provide cleaner, brighter light for chopping and other detailed work. However, ensure it’s part of a layered scheme so you can rely on the warmer lights for ambiance.
How to Layer Industrial Lighting for a Designer Finish
A single light source is never enough. Professional designers use a technique called “layering” to create a kitchen that is both functional and atmospheric. This involves combining three types of light.
Start with Ambient Lighting
This is the general, overall illumination that fills the room and allows you to navigate it safely.
- Sources: In an industrial kitchen, this can come from stylish flush or semi-flush mounts, a grid of recessed lights, or even a large central chandelier in a high-ceilinged space.
Add Focused Task Lighting
This is direct, bright light aimed at specific work surfaces where you perform tasks like cooking, chopping, and washing.
- Sources: This is where industrial pendants over the island, under-cabinet LED strips illuminating countertops, and wall sconces by the sink or stove become essential.
Finish with Accent Lighting
Accent lighting is used to draw attention to architectural features or decorative elements, adding depth and visual interest to the room.
- Sources: Use adjustable track lighting to highlight a beautiful exposed brick wall, artwork, or your collection of open-shelved ceramics.
The Importance of Dimmers
Pro Tip: Dimmers are non-negotiable for a successful kitchen lighting plan. They give you complete control over the mood, allowing you to transition from bright, functional task lighting during meal prep to a soft, warm, ambient glow for a relaxed dinner or a quiet evening.
Industrial Lighting Ideas for Every Kitchen Layout
One of the biggest challenges homeowners face is adapting a design style to their specific layout. Industrial lighting is versatile enough for any space, from a compact HDB BTO flat to a sprawling landed property. The key is to select fixtures that are appropriate in scale and function for your kitchen’s footprint.
For Small or Galley Kitchens
In a smaller or narrow galley kitchen, the strategy is to maximize functionality without overwhelming the space. You need to focus on verticality and prevent visual clutter on the ceiling.
- Strategy: Avoid using multiple bulky pendants, which can make the ceiling feel lower and the room narrower. Instead, think streamlined and multi-functional.
- Ideas:
- Linear Track Lighting: A single track light running down the center of the ceiling is a perfect solution. Use adjustable heads to point light towards the countertops on both sides, ensuring your workspaces are well-lit without needing multiple fixtures. A matte black track creates a strong graphic line that can make the room feel longer.
- Single Linear Pendant: One long, slim linear pendant with multiple bulbs can provide excellent coverage over the main walkway and work areas. It offers the impact of pendant lighting without the bulk of separate fixtures.
- Wall Sconces & Under-Cabinet Lights: Supplement your main ceiling light with wall sconces at the end of the galley or over the sink. Combine this with under-cabinet LED strips to guarantee all your counters are bright and shadow-free. This approach keeps the ceiling clean while providing ample task lighting.
- Pro Tip: In a small kitchen, choose fixtures with a more open design, like a simple cage pendant or an exposed bulb fixture, as they appear lighter and less visually intrusive than solid dome pendants.
For Kitchens with a Large Island
If you have a large kitchen island, it’s naturally the heart of the room. Your lighting should treat it as such, making it a clear and dramatic focal point for both tasks and social gatherings.
- Strategy: Use statement lighting to anchor the island within the larger kitchen space. The size and number of fixtures should be proportional to the island’s dimensions.
- Ideas:
- A Series of Pendants: The classic approach is to hang a series of two or three matching pendants. For a 2.4m island, three medium-sized (12-16 inch diameter) dome or cage pendants work perfectly. For a smaller 1.8m island, two slightly larger pendants create a balanced look.
- One Large Linear Chandelier: For a modern and impactful statement, a single oversized linear fixture can be more powerful than multiple smaller lights. Look for a rectangular chandelier with exposed bulbs or a long metal bar design.
- An Odd-Numbered Cluster: For a more eclectic, gathered look, hang a cluster of three or five smaller exposed-bulb pendants at slightly different heights over the center of the island.
- Pro Tip: A simple rule for scale is that the combined width of your pendant lighting should not exceed two-thirds of the island’s length. This ensures the lighting feels substantial but not overpowering.
For Open-Plan Kitchens
In an open-plan living and dining area, lighting is one of the most effective tools for defining different zones without building walls. The goal is to create a distinct identity for the kitchen area while maintaining a cohesive feel with the rest of the space.
- Strategy: Use a bold lighting installation to create a visual “ceiling” or boundary for the kitchen, separating it from the adjacent living or dining zones.
- Ideas:
- Bold Track Lighting System: Install a square or rectangular track lighting system that follows the perimeter of the kitchen work area. This creates a strong architectural frame that clearly says, “This is the kitchen.” Angle some lights inward for tasks and others outward to wash a wall or cabinet face.
- A Cluster of Pendants: A large cluster of pendants over the island or peninsula acts as a visual stop, separating the kitchen from the living room. This creates a beautiful focal point that is visible from all areas of the open-plan space.
- Consistent Finishes: To ensure the entire open-plan area feels connected, use lighting fixtures with consistent finishes. For example, if you have matte black pendants in the kitchen, choose a dining chandelier and living room floor lamp with matte black accents. This creates a subtle but powerful design thread that ties the zones together.
- Budget Tip: Defining a zone doesn’t have to be expensive. Even a simple, affordable track lighting kit from a retailer can create a strong visual boundary when installed thoughtfully.
Common Mistakes to Avoid When Designing Your Industrial Kitchen Lighting
At Yang’s Inspiration Design, our integrated team of designers and licensed electricians often helps clients correct lighting schemes that aren’t quite working. Drawing from our hands-on experience in countless Singaporean homes, here are the three most common mistakes we see and how to avoid them.
Mistake #1: Too Much Glare
The exposed Edison bulb is an icon of industrial style, but it’s easy to have too much of a good thing. Many homeowners fall in love with the look but end up creating a space that’s uncomfortable to be in.
- The Problem: Using too many exposed, high-wattage, or non-dimmable filament bulbs creates harsh, direct glare. This is particularly problematic in a kitchen where you spend a lot of time. The light shines directly into your eyes when you’re sitting at the island or even standing and chopping, leading to eye strain and headaches. A bright, cool-white (4000K or higher) exposed bulb is one of the biggest offenders, creating a sterile and clinical feel instead of a warm, inviting one.
- The Solution:
- Choose the Right Bulbs: Always opt for warm white (2700K-3000K) LED Edison bulbs. They provide the vintage aesthetic without the harshness.
- Dim, Dim, Dim: Install dimmers on every light switch. This is non-negotiable. It allows you to have bright light when you’re working and a soft, ambient glow when you’re relaxing.
- Strategic Placement: Position pendants so that the bulb is not directly in your line of sight when seated. For task lighting over a counter, consider fixtures with a dome or shade that directs the light downwards onto the surface, shielding your eyes from the source.
- Use Frosted or Shaded Options: If a fixture will be in your direct line of vision, consider one with a frosted glass shade or a metal dome. You still get the industrial look without the painful glare.
Mistake #2: Forgetting to Layer
Another frequent issue is relying solely on one type of lighting—usually a set of beautiful pendants over the island—to illuminate the entire kitchen.
- The Problem: While statement pendants are a great focal point, they are essentially task lights. By themselves, they create bright “pools” of light on the island but leave the rest of the kitchen in relative darkness. This results in shadowy corners, poorly lit perimeter countertops, and a lack of overall ambient light, making the kitchen feel smaller and less functional. You’ll find yourself chopping in your own shadow by the sink or struggling to find items in your cabinets.
- The Solution: A properly layered lighting plan is the only way to ensure a kitchen is both beautiful and practical. You must combine all three layers:
- Ambient (General) Light: Start with a foundation of general light from recessed downlights or a stylish industrial flush mount. This fills the room and gets rid of dark corners.
- Task (Focused) Light: This is where your pendants over the island come in. But don’t stop there. Add under-cabinet LED strips to light up all your main work surfaces. This is one of the most impactful additions you can make.
- Accent (Highlight) Light: Use track lights or a single wall sconce to highlight a feature, like a piece of art or a textured backsplash, to add depth and personality.
Mistake #3: Ignoring Scale
The final common pitfall is a mismatch between the size of the lighting fixtures and the proportions of the room or the furniture within it.
- The Problem: This happens in two ways: fixtures that are too small or too large. A row of tiny, undersized pendants over a large, substantial island looks timid and gets lost in the space, failing to create the desired impact. Conversely, a massive, heavy chandelier in a small, low-ceilinged HDB kitchen can feel oppressive and make the room feel cramped and unbalanced.
- The Solution:
- For Kitchen Islands: A good rule of thumb is to choose pendants with a diameter that is visually pleasing relative to the island’s width. For a trio of pendants, ensure they don’t visually extend beyond the edges of the island. Leave about 6 inches of clearance on each end. For example, on a 96-inch (8-foot) island, you might use three 14-inch pendants spaced 30 inches apart, which would occupy about 72 inches of visual space, leaving 12 inches on each end.
- For General Lighting: The diameter of a central flush mount or chandelier can be estimated by adding the room’s length and width in feet, and then converting that number to inches. For example, a 10-foot by 12-foot kitchen (22 feet total) would suit a central fixture that is approximately 22 inches in diameter. This provides a balanced starting point.
Conclusion
Mastering your industrial style kitchen lighting ideas is about creating a thoughtful balance. It’s about pairing the raw, utilitarian aesthetic of metal, wood, and concrete with the inviting warmth of layered light. By carefully selecting functional fixture types—from statement pendants and flexible track lights to essential sconces—and paying close attention to materials, bulb temperature, and scale, you can achieve a kitchen that is much more than a place to cook.
Don’t be afraid to experiment. Use these expert tips and ideas as a starting point to design a space that is both stylishly bold and perfectly suited to your daily life. With a well-executed, layered lighting plan, your industrial kitchen will be a functional workspace by day and a dramatic, atmospheric hub for your home by night.
Ready to bring your industrial kitchen vision to life with a flawless, professional finish? The team at Yang’s Inspiration Design handles everything from design and project management to in-house carpentry and electrical work, backed by a lifetime workmanship warranty. WhatsApp us at 8855 7575 for a complimentary design consultation today.

December 15, 2025
Yang's Inspiration Insight